
Saturday, 24 August 2013

Monday, 8 April 2013
Recreating a cresting rail
I needed to replace the chair's cresting rail because the original is broken into two pieces and repeated gluing attempts by the previous owners seemed doomed to failure.
Using the original as a template I drilled the angled holes for the back spindles into a block of timber which was formed from three separate pieces of wood to achieve the necessary thickness to accommodate the cresting rail's curve.

Some band sawing, bobbin sanding and disc sanding later - I've got to this stage:
.jpg)
More work with a spoke shave and then the high tension of the glue up!
Sunday, 7 April 2013
Windsor style chair to restore
A much loved Windsor style chair has found its way into my workshop for a little bit of restoring and TLC. The cresting rail is broken into two pieces and the H shaped stretcher assembly of the legs needs removing and reassembling correctly. You can see in the pic that I've already turned a replacement spindle for the the back rest where one had given way. It'll be a great way to familiarise myself with the construction of the popular Windsor chair design.

Sunday, 10 February 2013
Walnut Tree
And while I'm here... next in the woody tune series is...
Keane - Walnut Tree (Who knew?)
Keane - Walnut Tree (Who knew?)
He waited a long long time.
For Dana
JOY!! A comment on a post from last year landed in my in box this week.

And some detail shots:


So... There you have it. And thank you Dana for asking, I'm really chuffed at your interest.
Caroline
Someone had seen my final term project design on the May 2012 post Cabinet-making and was interested in seeing how the big adventure had turned out.
I'm afraid I haven't taken any proper portfolio photos of "The Dandy" yet because it is so tall and I haven't figured out how to get it all on a decent backdrop etc. So these are phone pics and a bit noisy; but you get the idea.
Here is "The Dandy" in the corner of our office:

And some detail shots:
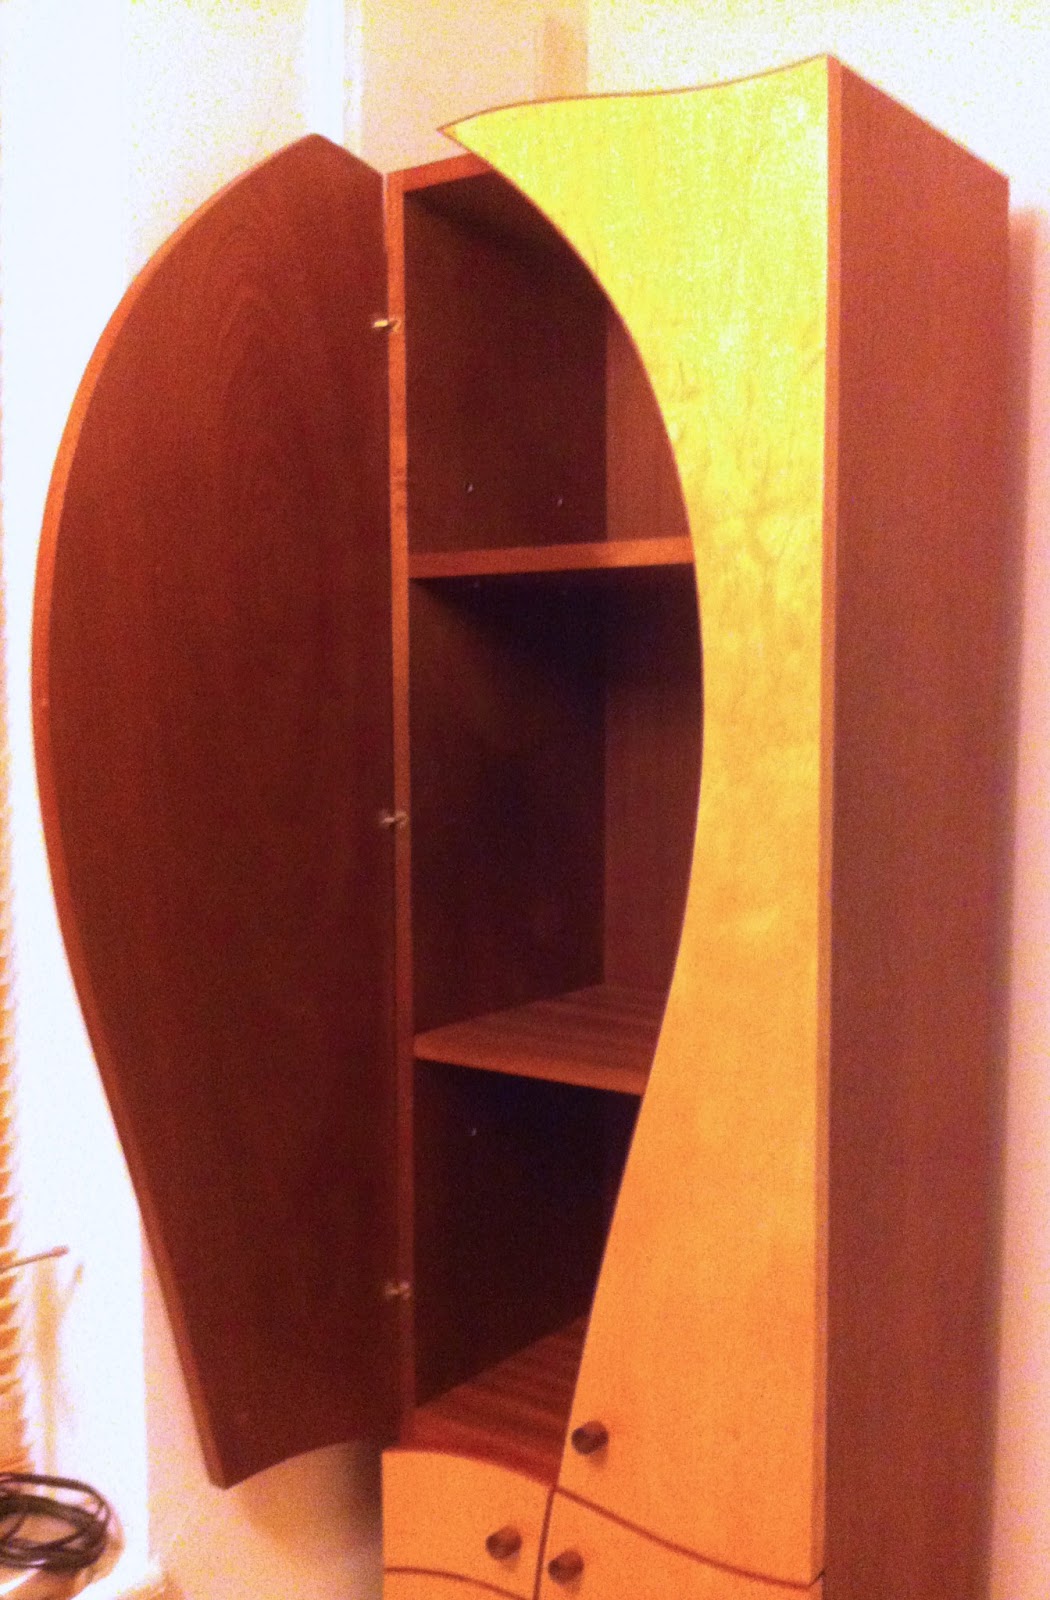


So... There you have it. And thank you Dana for asking, I'm really chuffed at your interest.
Caroline
Saturday, 1 December 2012
Wye Oak
After spending most of November creating a series of beautiful hard wood storage boxes out of three colours of woods: American Black Walnut, American Cherry and Maple. (You can see final product here) I have moved on to a new commission to design and make two oak blanket chests.
The oak that I am working with has come from Latvia via English Woodland Timber and I was amazed when I machined it into components to reveal a gorgeous warm and creamy texture to the wood. The finished products are going to be beautiful.
It's still early days but this is where I'm at with it thus far.

Wonderful oak, hey?
So.... according to Wikipedia, The Wye Oak used to be the biggest white oak tree in the US. It grew in Maryland but was felled by a storm in 2002.
I was looking it up because I want to post Wye Oak's (the band) track "Civilian" as the next track in my woody music series. So here you go:
Oh the oaky oaky cokey..... etc
The oak that I am working with has come from Latvia via English Woodland Timber and I was amazed when I machined it into components to reveal a gorgeous warm and creamy texture to the wood. The finished products are going to be beautiful.
It's still early days but this is where I'm at with it thus far.

Wonderful oak, hey?
So.... according to Wikipedia, The Wye Oak used to be the biggest white oak tree in the US. It grew in Maryland but was felled by a storm in 2002.
I was looking it up because I want to post Wye Oak's (the band) track "Civilian" as the next track in my woody music series. So here you go:
Oh the oaky oaky cokey..... etc
Sunday, 7 October 2012
Felt lining
I've been making a presentation box for a canteen of cutlery out of English Cherry. The joints are through dovetails and the lid is veneered with a yew burr. Lovely.
All the woodworking stuff went very smoothly and enjoyably... It looks great with the pair of Brusso quadrant hinges that I've fitted to allow the lid (which will be lined with the knives) to rest open at 95 degrees.
Then I got on to the cutlery rests/slots.
Lining the tiny slots that I had created with a soft felt material was like Extreme Blue Peter - with blades.
I finished the fiddly felt bit at home today in a sawdust free environment.
Bring on the finishing and polishing.
And here's a wood-y tune:
All the woodworking stuff went very smoothly and enjoyably... It looks great with the pair of Brusso quadrant hinges that I've fitted to allow the lid (which will be lined with the knives) to rest open at 95 degrees.
Then I got on to the cutlery rests/slots.
Lining the tiny slots that I had created with a soft felt material was like Extreme Blue Peter - with blades.
I finished the fiddly felt bit at home today in a sawdust free environment.
.JPG) |
| The base of the presentation box |
Bring on the finishing and polishing.
And here's a wood-y tune:
Tuesday, 2 October 2012
Wednesday, 26 September 2012
September Work in Progress
An old pine rafter from Brighton's Recycled Wood Project, chopped in two to fit in the back of the car, machined back to the beautiful pinky orange of aged pine, ready to be made into a coffee table and display cabinet for a huge Lego model of the Star Wars Milennium Falcon.
Just need the top, bottom and sides now...
 |
| The raw material |
 |
| An early dry clamp-up |
 |
| Glued up and lined. |
Just need the top, bottom and sides now...
Sunday, 24 June 2012
Beading
 This week I have been mostly constructing small drawers with dovetail joints and well-beaded slips.
By "well-beaded", I mean that I manually cut a delicate line of beading along about half a mile of sapele to create the requisite SIXTEEN drawer slips.
More exciting developments include the newly veneered and fitted back panels which have slid into the grooved munting as planned.
More adventures in veneering coming up next week.
Tuesday, 12 June 2012
Progress report (Sapele and birch cabinet)
 |
The carcass, shelves, munting, drawer runners, guides and dust boards are all complete.
I still need to veneer the back board, construct and shape the stand and there is also the small matter of making eight drawers. (Whose silly idea was a cabinet with eight drawers?)
We had a class outing to the veneer shop (Capital Crispin Veneers) somewhere in East London last week. Piles and piles of veneers in a huge warehouse at the back of the Galleon shopping centre - where is that??
John - Master woodworker and wise man - was very taken with the Malaysian Tiger Wood veneer... (orangey and stripey) But he managed to resist.
I came away with a roll of ice birch veneer for the doors and drawers of my magnificent cabinet! It has some very pretty grain figuring and a small amount of ripple which will look beautiful when polished up.
So tomorrow... back to the machine shop to prepare the rest of the drawer components... 16 drawer sides, 8 drawer backs, 8 drawer bottoms...
Or fashioning a set of dancey feet to stand the beast on.
We'll see.
(pic caption: The top section will have two shelves (but they're just sat on top of the drawer section for now!) the asymmetric drawers are still to be built)
Saturday, 19 May 2012
Cabinet-making
For my final project while still a student on John Lloyd's fine furniture-making course, I am making a cabinet. Initially I was thinking of making a corner cabinet but as I was making sketches and plans I decided against it because there would be less usable space within it.
This is a basic sketch of my idea. The swooping serpentine curve will form the edges of the top section's cabinet doors. It will then flow through the middle section of eight drawers and down through the lower cabinet door to the cabinet's foot where it ends with a flourish.

This is a basic sketch of my idea. The swooping serpentine curve will form the edges of the top section's cabinet doors. It will then flow through the middle section of eight drawers and down through the lower cabinet door to the cabinet's foot where it ends with a flourish.

The cabinet will be about 2 metres tall by 40cm wide and 30 cm deep.
I went to English Woodlands Timber to get the wood on Friday. Warehouse man, Graham, helped me nose through piles of boards to find the ones that I wanted.
The carcass will be constructed from Sapele, a tropical red-coloured hard wood, the batch that I selected my boards from had been imported from the Democratic Republic of Congo.
Most of the cabinet's front will be from Maple which is a beautiful light coloured wood with a very close grain.
Unfortunately the wood won't be delivered until Tuesday/Wednesday and so in the meantime I think I'll be making a few templates for all those curves...
Vincent's American cherry shelf and bookcase
A late shelving update...

Finished in Osmo polyx oil for a beautiful satin finish which enhances the wonderful grain that runs through the American Cherry wood.
The wood came from those lovely folk at English Woodlands Timber.
Thursday, 29 March 2012
A library for Vincent
Vincent was once a magnificent creature roaming around some fecund forest somewhere, escorting his does and wrestling the male competition with his impressive antlers.

That was some time ago.
Now his head hangs grandly on a living room wall in Brighton, East Sussex.
I have been commissioned to create some shelving in his alcove.
The room is blessed with sunshine for a good portion of the day, the sash windows reach from floor to high ceiling and a beautiful modern chandelier hangs in the centre of the room.
Because of the light and the proportions of the room, the decor is bold with pieces of dark wood furniture and a rich red on the walls.
I've been asked to fit three shelves: One running the width of the space and two more floating shelves next to the desk.
After some discussion of options, my client has plumped for American Cherry timber. A good chunky thickness for the long shelf and a slightly lighter weight for the shorter shelves alongside the desk.
I start work April 10th. Very exciting.

That was some time ago.
Now his head hangs grandly on a living room wall in Brighton, East Sussex.
I have been commissioned to create some shelving in his alcove.
The room is blessed with sunshine for a good portion of the day, the sash windows reach from floor to high ceiling and a beautiful modern chandelier hangs in the centre of the room.
Because of the light and the proportions of the room, the decor is bold with pieces of dark wood furniture and a rich red on the walls.
I've been asked to fit three shelves: One running the width of the space and two more floating shelves next to the desk.
After some discussion of options, my client has plumped for American Cherry timber. A good chunky thickness for the long shelf and a slightly lighter weight for the shorter shelves alongside the desk.
I start work April 10th. Very exciting.
Tuesday, 6 March 2012
I'll be your Emmylou...
Scandinavian loveliness. First Aid Kit's video for Emmylou.
but they are a little spooky aren't they?
Saturday, 3 March 2012
The Fish Tank's Grand Stand
I was asked to design and build a stand for a round 35 litre fish tank. So I did. Using walnut veneer on board and lipped with French walnut I created a contemporary looking design with a circle through its core to complement the glass globe. I finished the piece with a wax oil on top of shellac to give it low sheen silk finish.


Sunday, 23 October 2011
Glues and hooves and veneer
Been maintaining blog silence for a while because we've been offline at home while we changed internet provider (Talk Talk truly are abysmal).
In the meantime Kenny the dog has been doubling in length, height and badass attitude and I've managed to acquire some new woodworking knowledge and a few tools to make it look convincing.

I'm hoping for some precise and eminently beautiful dovetails to join it all together and a stunning veneered lid. It's early days...
Bonus content... Our visit to Cockings Sawmills, Midhurst, West Sussex.
In the meantime Kenny the dog has been doubling in length, height and badass attitude and I've managed to acquire some new woodworking knowledge and a few tools to make it look convincing.
 |
| My bench adorned with some fetching new tools |
Last week was veneering - not a craft for a sensitive vegetarian. I spent most of last week covered in animal glue... a product of melted down hide and hooves that is warmed gently over hot water for use. It smells like something that has died but you do get used to that.
It is irritatingly sticky and messy though and should only be used by skilled, organised and coordinated craftsfolk.
I managed to stick myself to the bench and cover my veneer panels with thick residues that will take a week of finishing and polishing classes to remove.
That said, I was chuffed by my veneered panel with Zebrano edging (oh yes) and a line and a jolly 2-tone star in the middle:

Next I start work on my small box. I am making it out of French walnut which is a gorgeous wood with a slightly salmon coloured tone to it.
 |
| French Walnut planed flat |
 |
| I am also learning how to do technical drawings and plans. This is a plan for a small box |
Bonus content... Our visit to Cockings Sawmills, Midhurst, West Sussex.
Monday, 3 October 2011
Precision
After a week of skinning various pieces of wood to reveal their inner beauty, i put down my plane.
In response to my bleatings about RSI, John (Cabinet-maker-in-chief) showed mercy and introduced me to the art of the dovetail joint.
A seasoned dovetailer of his calibre can make the whole exercise in precision look like a simple process of light sawing and delicate wood love with a chisel. I found it slightly less simple.
His show-and-tell session lasted no more than half an hour and resulted in an immaculate no-gaps-joint.
Around six hours later I produced a joint that looked a bit like a set of badly looked after teeth.
He examined my offering while endeavouring to find some small redeeming feature to use as means of encouragement.
He couldn't.
He couldn't.
"It's all about precision, you see." he reiterated.
My head swam with examples of my innate lack of precision both practical and intellectual.
I ignored them and set about a new set of dovetails, my tongue poking out in concentration - like a 6 year old learning to write.
 |
| Kenny drools over my dovetails |
I ignored them and set about a new set of dovetails, my tongue poking out in concentration - like a 6 year old learning to write.
I will learn precision, I will!
Days passed.
I sawed and chiseled away at four further dovetail sets, each one improving minutely in quality on the one before.
The fifth was no triumph but would serve its purpose.
John, probably running out of ways of turning negatives into positives, has redirected me to my cast-aside Clifton jack plane.
John, probably running out of ways of turning negatives into positives, has redirected me to my cast-aside Clifton jack plane.
Sunday, 25 September 2011
RSI
Two weeks in to my new cabinet-making course and I have a Repetitive Strain Injury in my right hand and arm.
 It's largely due to my inept use of my newly purchased Clifton No. 5 1/2 Jack plane, a bloody great lump of cast iron, 15 inches long. It is the #1 tool in your cabinet-making box. You have to be able to flatten wood with it.
The day it arrived, I was shown how to dismantle it completely and ready it for use before putting it all back together again.
I rounded off too-square-edges with a metal file, I buffed and polished the flat surface that hosts the blade that I made lethal with first a grinding stone and then sharpening and polishing stones.
I planed a piece of wood until it was gleaming like glass; I then sawed it in half length-ways and planed the newly exposed surfaces perfectly flat so that I could glue them back together again AND NOT SEE THE JOIN. I could - a little - but I was quietly pleased with my first planing exercise.
I have since made a 'scratch stock' and a 'veneer hammer'. I used the scratch stock to put inlay in my shiny, planed, re-joined piece of wood. Nice.
So the next challenge is to make a saw block ... or some similar name... (not good on the requisite cabinet-making vocabulary yet) it involves planing nine pieces of wood on all four sides and sticking them together.
I spent eight hours planing on Friday.
Yet I have only done six of the pieces of wood and only on two of their four sides. Crap. I was doing it wrong.
Then, I inadvertently sharpened my plane blade into a smile. Cabinet-makers prefer straight lines.
My right hand is swollen and numb, my right arm is tight with strained muscle and my shoulder and back are stiffened with the physical exertion.
Tomorrow I'm back at my bench (not my 'desk' as I keep calling it - to the chagrin of John, the Cabinet-maker-in-chief) and I'm going to wipe the smile off the face of that blade and with some more feverish strokes with the Clifton Jack plane I will continue to flatten those nine pieces of wood into something pretty and possibly useful too.
An injury update will appear here soon.

The day it arrived, I was shown how to dismantle it completely and ready it for use before putting it all back together again.
I rounded off too-square-edges with a metal file, I buffed and polished the flat surface that hosts the blade that I made lethal with first a grinding stone and then sharpening and polishing stones.
I planed a piece of wood until it was gleaming like glass; I then sawed it in half length-ways and planed the newly exposed surfaces perfectly flat so that I could glue them back together again AND NOT SEE THE JOIN. I could - a little - but I was quietly pleased with my first planing exercise.
I have since made a 'scratch stock' and a 'veneer hammer'. I used the scratch stock to put inlay in my shiny, planed, re-joined piece of wood. Nice.
So the next challenge is to make a saw block ... or some similar name... (not good on the requisite cabinet-making vocabulary yet) it involves planing nine pieces of wood on all four sides and sticking them together.
I spent eight hours planing on Friday.
Yet I have only done six of the pieces of wood and only on two of their four sides. Crap. I was doing it wrong.
Then, I inadvertently sharpened my plane blade into a smile. Cabinet-makers prefer straight lines.
My right hand is swollen and numb, my right arm is tight with strained muscle and my shoulder and back are stiffened with the physical exertion.
Tomorrow I'm back at my bench (not my 'desk' as I keep calling it - to the chagrin of John, the Cabinet-maker-in-chief) and I'm going to wipe the smile off the face of that blade and with some more feverish strokes with the Clifton Jack plane I will continue to flatten those nine pieces of wood into something pretty and possibly useful too.
An injury update will appear here soon.
Subscribe to:
Posts (Atom)